
Loyalty Programs
Introduction
In this workshop, you’ll create a loyalty program in Loyalty Management and configure tier groups, tiers, currencies, benefits, product categories, products, vouchers and members.
Watch this video to understand how to create a loyalty program and add its tiers and currencies.
Create a Loyalty Program Using Simplified Setup
A loyalty program is your starting point for setting up Loyalty Management in your Salesforce org. It helps to design, organize, and customize the loyalty building blocks with loyalty programs.
The simplified setup enables program managers to create a loyalty program, and add redeemable currencies, define tier groups and tiers, map benefits, and track eligible activities.
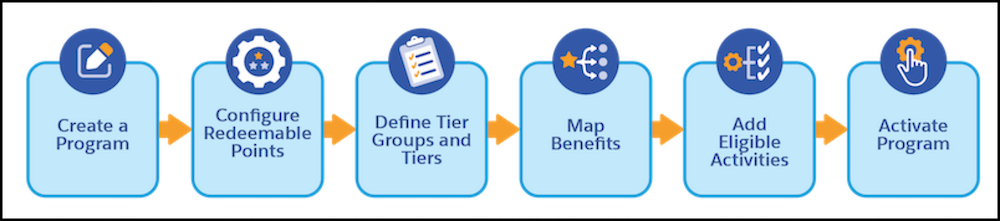
In this exercise, you will create a loyalty program by entering a few basic details.
- Search for
Loyalty Program Simplified Setupfrom App Launcherand select the menu item. - Click Create Program.
- Enter
NTO Insiderin the Name field. - Enter
Loyalty program for fashion enthusiastsin the Description field. - Click Save.
Loyalty program names
It is recommended to choose a program name that represents your brand and resonates with members.
Configure Redeemable Points
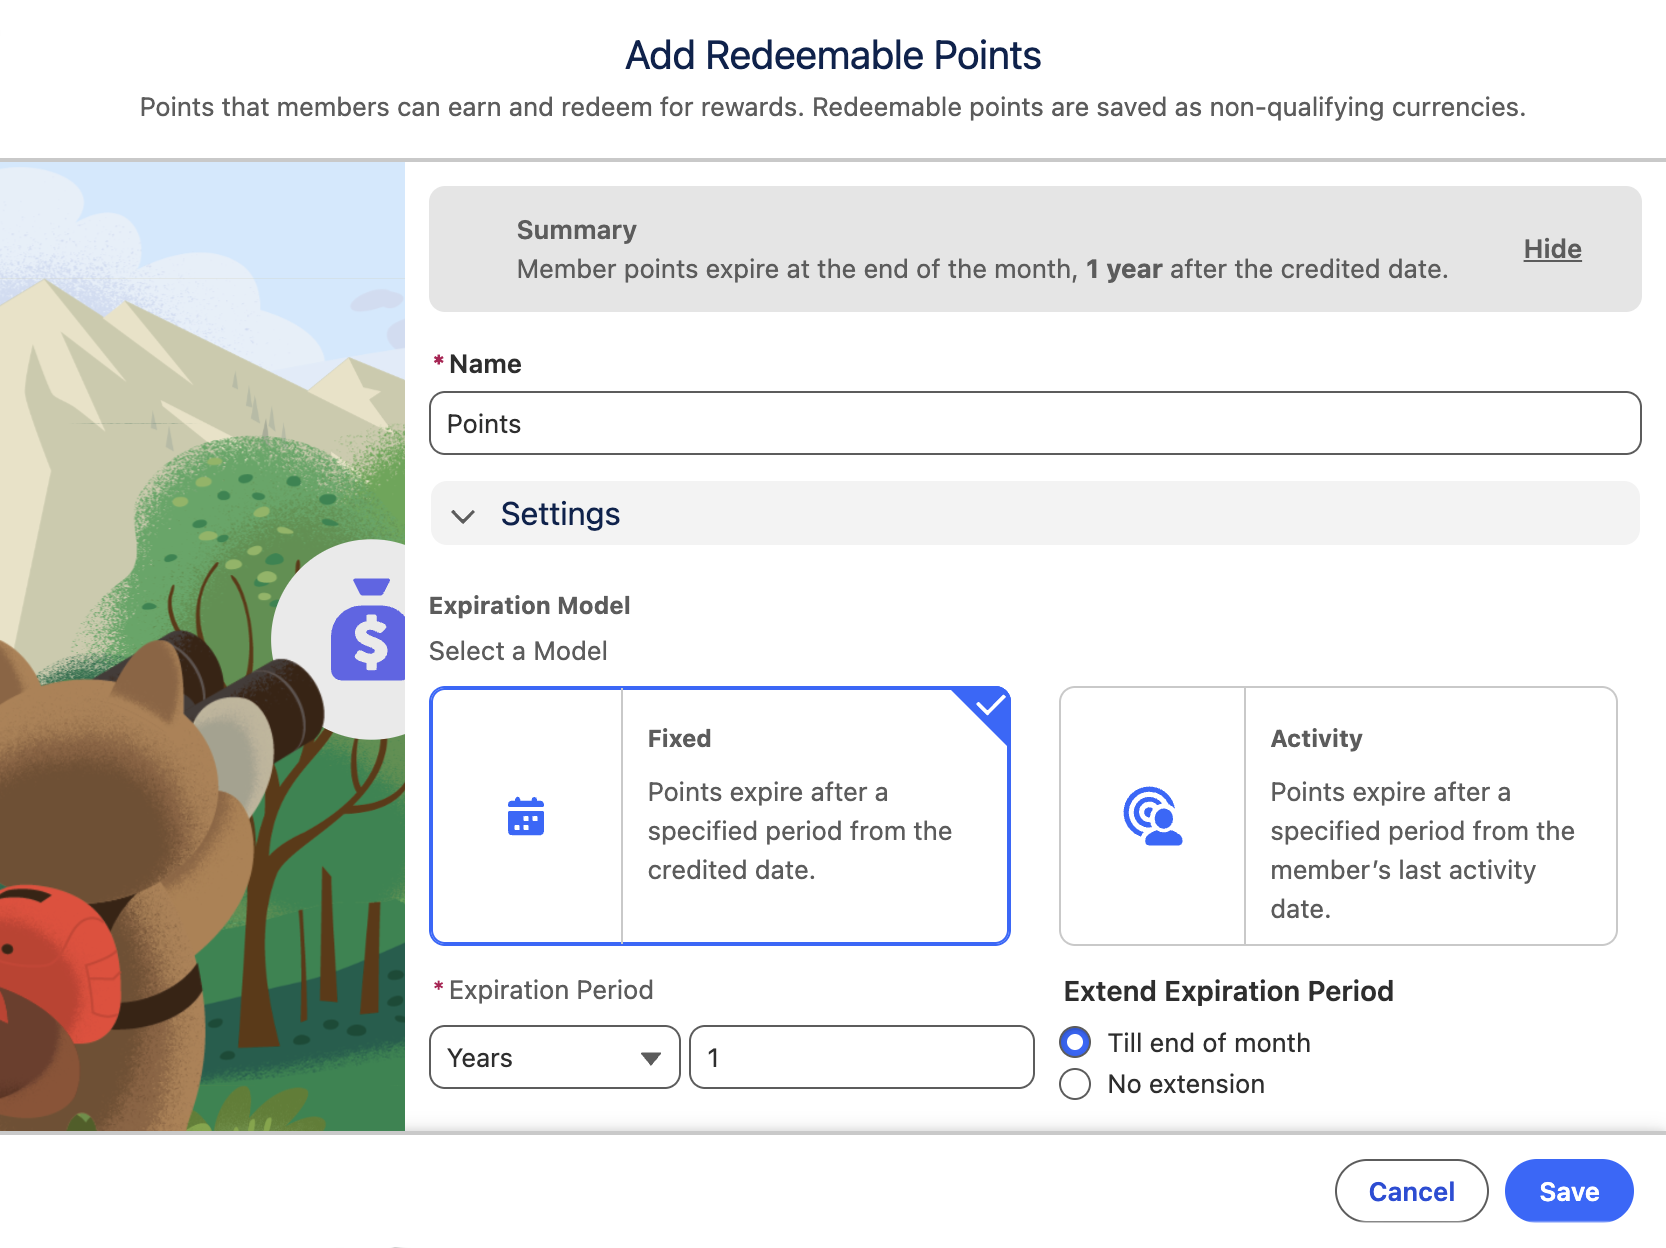
In this exercise, you will configure non-qualifying points that the members can earn and redeem for rewards. Then you will select an expiration model and configure other expiration details that suit your program.
- Click
Add Redeemable Points - Enter
Pointsin the Name field. - Expand the
Settings section. - Leave the Expiration Model as Fixed.
- Leave the Expiration Period to the default value of 1 Years.
- Set Extend Expiration Period to No extension.
- Click Save.
Define Tier Group and Tiers
In this exercise, you will create tier groups, and configure the tier model and the expiration details. You will then add tiers to tier groups and set the minimum point balance required to attain each tier.
- Click
Add Tier Group - Enter
Status Tier Groupin the Tier Group Name field. - Enter
Tier Pointsin the Qualifying Points Name field. - Expand the
Settings section. - Leave the Tier Model as Fixed.
- Set the First Qualifying Period End Date to Dec 31 of the current calendar year.
- Leave the Tier Qualifying Period Duration to the default value of 1 Years.
- Leave the Tier Duration to the default value of 1 Years.
- Leave the Extend Expiration Period to the default value of No extension.
- Click Save and Next.
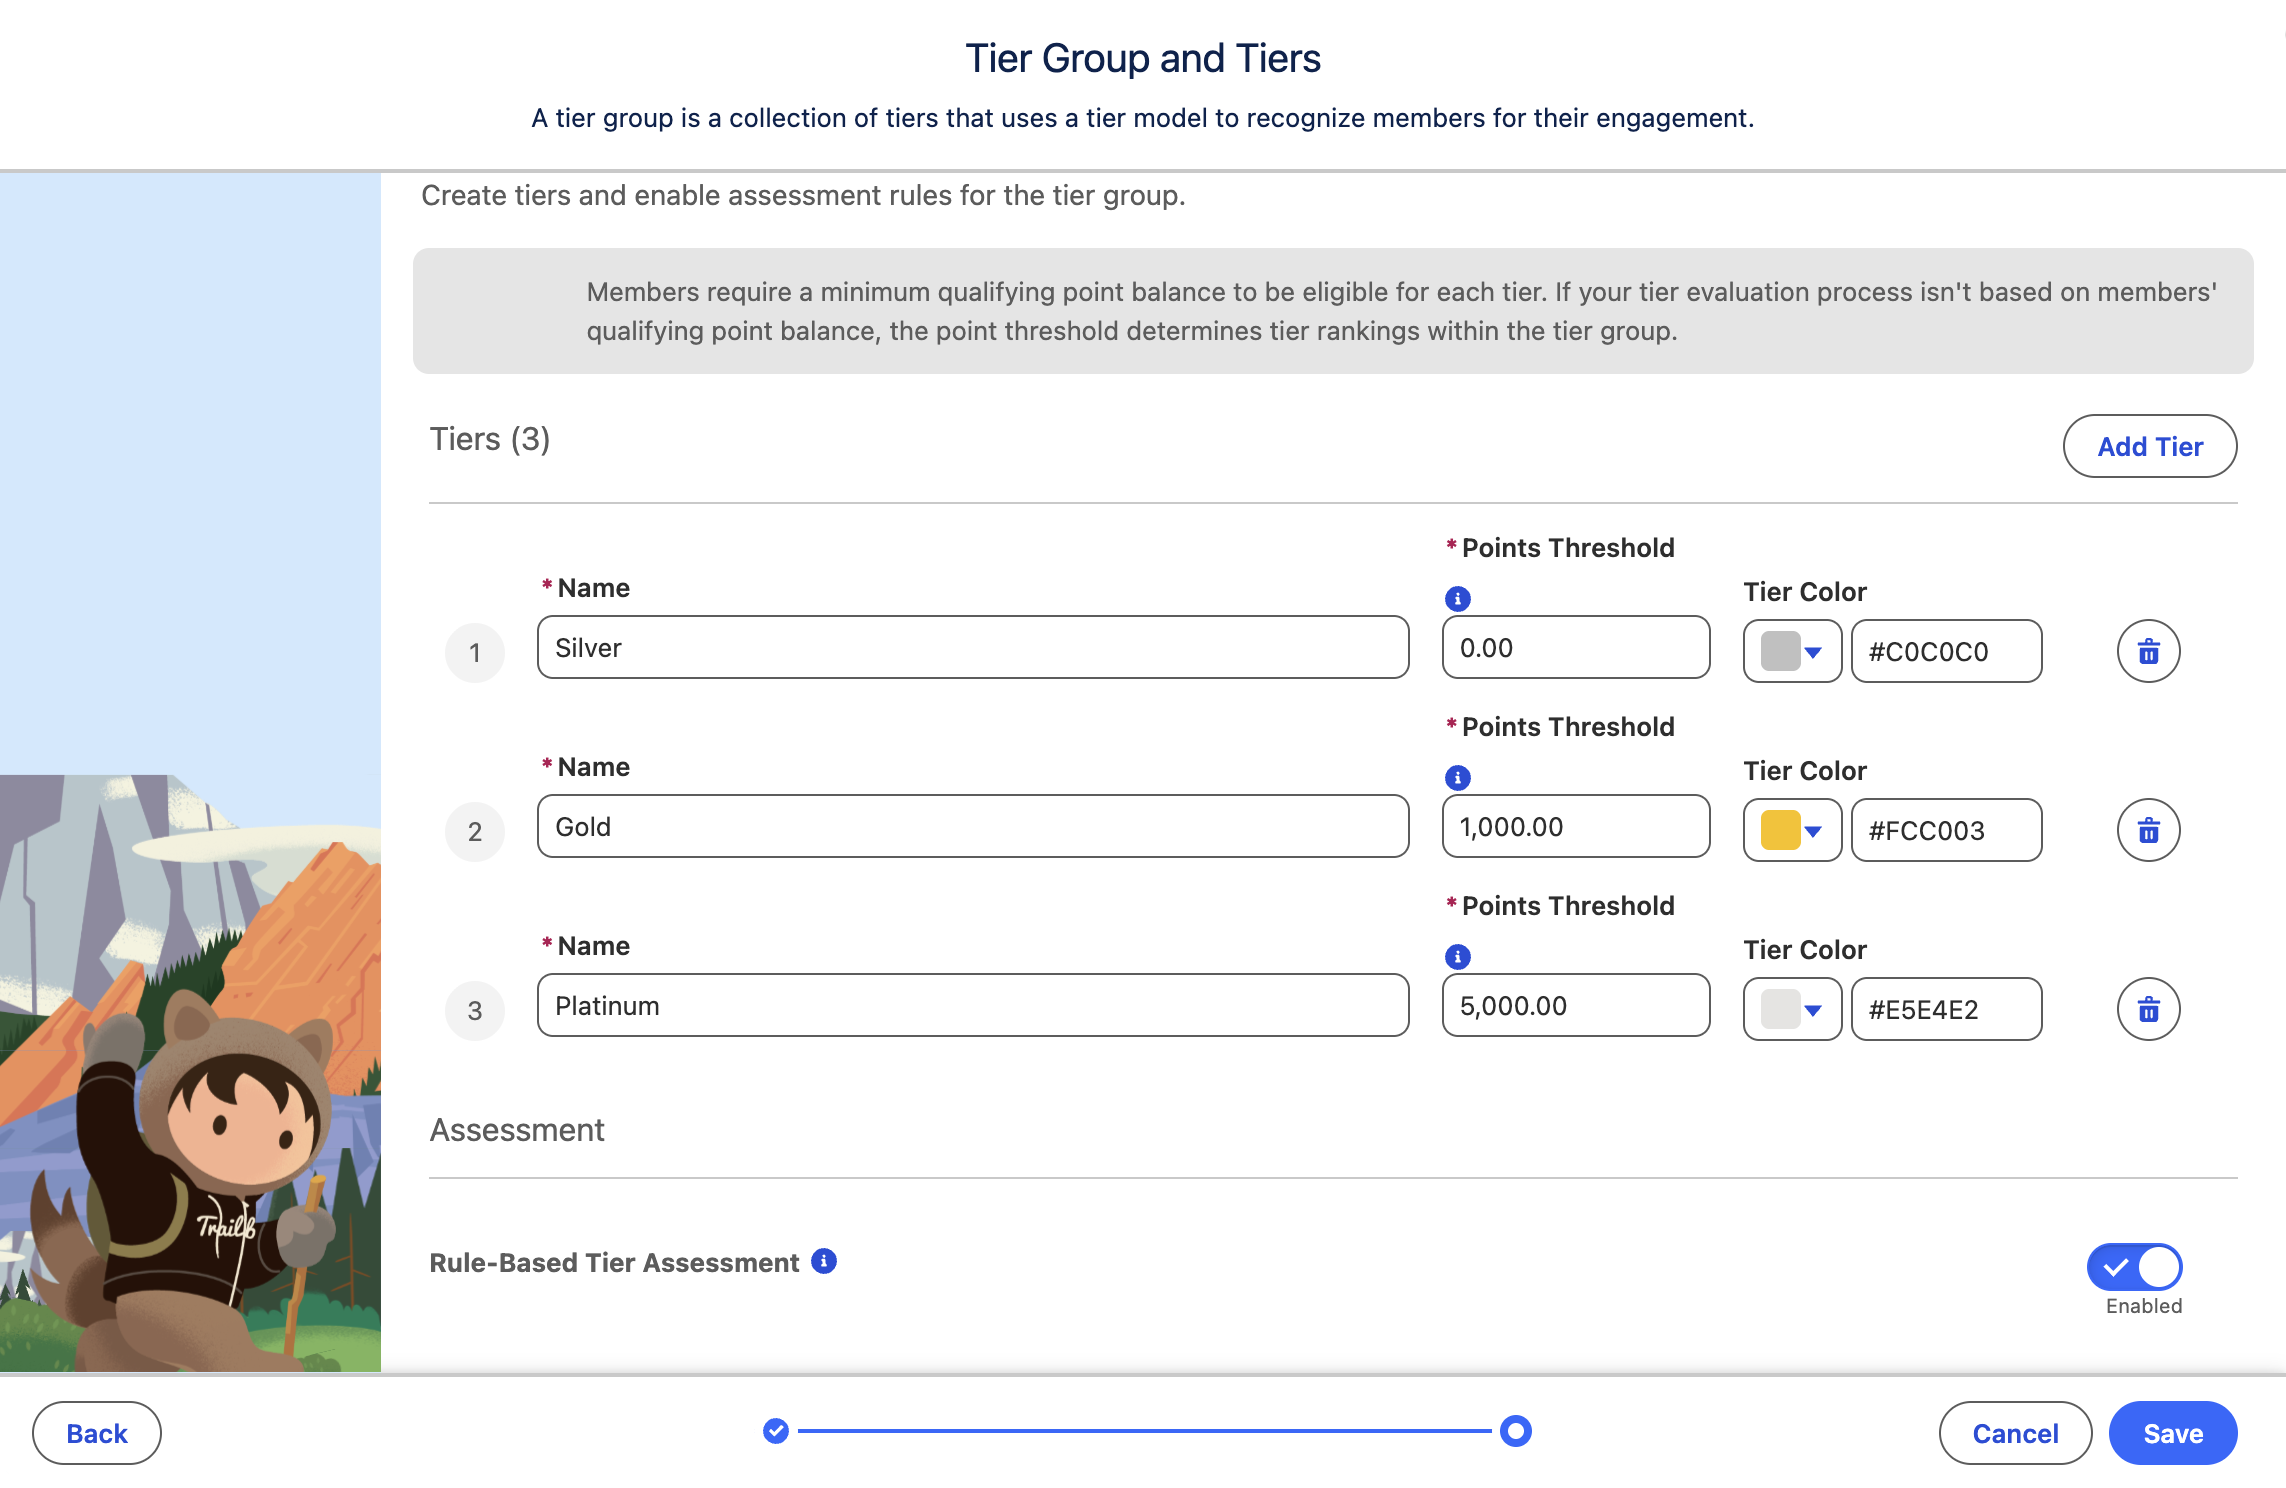
- Configure each tier row using the values in the table below.
| Name | Points Threshold | Tier Color |
|---|---|---|
Silver | 0 | #C0C0C0 |
Gold | 1000 | #FCC003 |
Platinum | 5000 | #E5E4E2 |
- Leave the Rule-Based Tier Assessment set to the default value of Enabled.
- Click Save.
Saving tier groups
Saving the tier group will automatically generate Loyalty Program Processes and Program Process rules for Tier Assessment (to manage both Tier Upgrade and Tier expiry scenarios) based on the eligible point balances that have been specified for each tier.
Define Benefits
Loyalty benefits are privileges that loyalty program members are entitled to receive. Loyalty program members are rewarded with benefits to increase their engagement in the program. As members move to higher tiers, they receive more benefits. Benefits can be used along with tiers to motivate members to reach higher tiers by enabling better benefits for higher tiers. Loyalty benefit includes:
- Benefit Type groups the benefits that are created under the benefit type. For example, Priority Phone Support and Standard Web Support.
- Benefits are created within the benefit type. Benefits are mapped to the members based on the tier or program rules. For example, Support Benefits.
- Benefit Action is an action that can be automatically triggered. For example, when a support benefit is defined, a corresponding Service Entitlement can be created in Service Cloud using Benefit Action.
- Dynamic Benefits are a type of benefit that can be issued to members due to engagement activities. For example, a member can receive a 'priority shipping' benefit for one month after they respond to a survey.
A loyalty program can have multiple benefit types. Each benefit type can have more than one benefit. Benefits can also be created with tiers.
Create Benefit Categories
- Click on the icon and click the first Setup menu item.
- Click Object Manager.
- Enter
Benefit Typein the Object Manager Quick Find field. - Select Benefit Type from the filtered list.
- Click Fields & Relationships.
- Click Category.
- Locate the Category Picklist Values section and click New.
- Paste the following values to the text area field:
Member Exclusives
Orders
Experiences- Click Save.

Create Unit of Measure
- Search for
Units of Measurefrom App Launcherand select the menu item. - Click New.
- Enter
Dollar Valuein the Name field. - Enter
USDin the Unit Code field. - Click Save.
Add Benefit Type with Benefits
- Return to the Loyalty Program Setup page from the initial exercise and expand the
Tier and Benefits section. - Click
Add Benefit Type with Benefits - Select Member Exclusives from the Benefit Category menu.
- Enter
Exclusive Discountsin the Benefit Type field. - Click Save and Next.
Creating Benefit Type Error
You may experience the following error when creating a benefit type:
We couldn’t create the Benefit type.
Select a unit of measure.
This is a known issue in SDO orgs and should not occur in production orgs. If you experience this issue follow the steps detailed in the Update Unit of Measure on Benefit Type Flow exercise, then return to this exercise to complete the remaining steps.
- Click Add Benefit.
- Enter
10% off on Apparel voucherin the name field. - Enter
10in the Priority field. - Select Silver and Gold from the Tiers menu.
- Click Add Benefit.
- Enter
15% off on Apparel voucherin the name field. - Enter
20in the Priority field. - Select Platinum from the Tiers menu.
- Click Save.
- Click
Add Benefit Type with Benefits - Select Orders from the Benefit Category menu.
- Enter
Shippingin the Benefit Type field. - Click Save and Next.
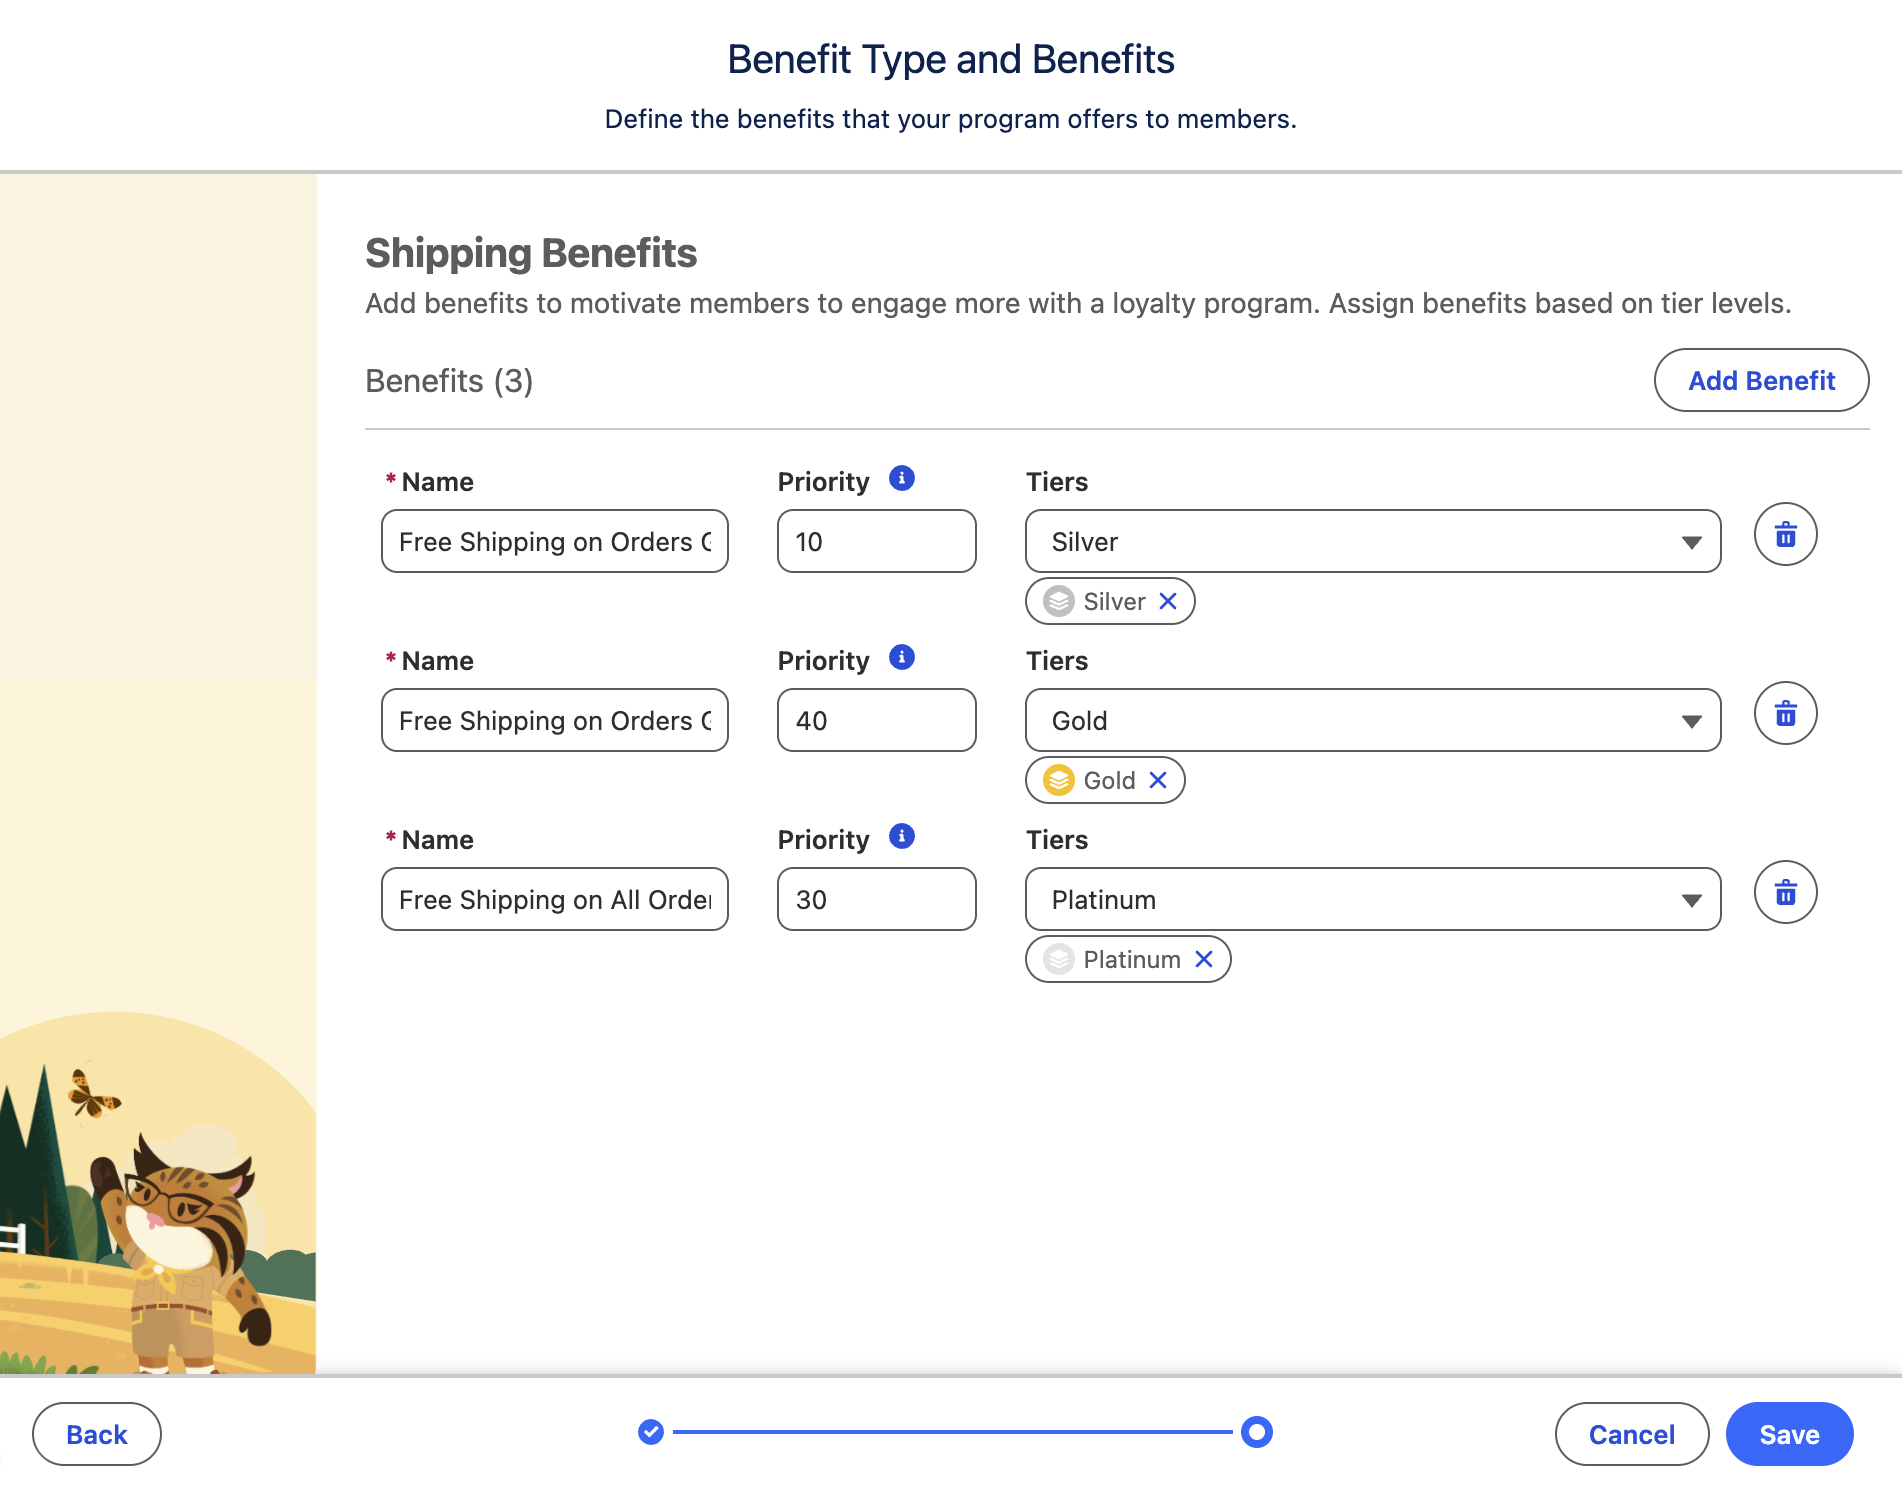
- Create three shipping benefits using the following values:
| Name | Priority | Tiers |
|---|---|---|
Free Shipping on Orders Greater Than $75 | 10 | Silver |
Free Shipping on Orders Greater Than $40 | 40 | Gold |
Free Shipping on All Orders | 30 | Platinum |
- Click Save.
Update Unit of Measure on Benefit Type Flow (optional)
Optional Exercise
The following steps are only required if you experience an error when creating a benefit type in the previous exercise.
- Search for
Flowsfrom App Launcherand select the menu item. - Click New.
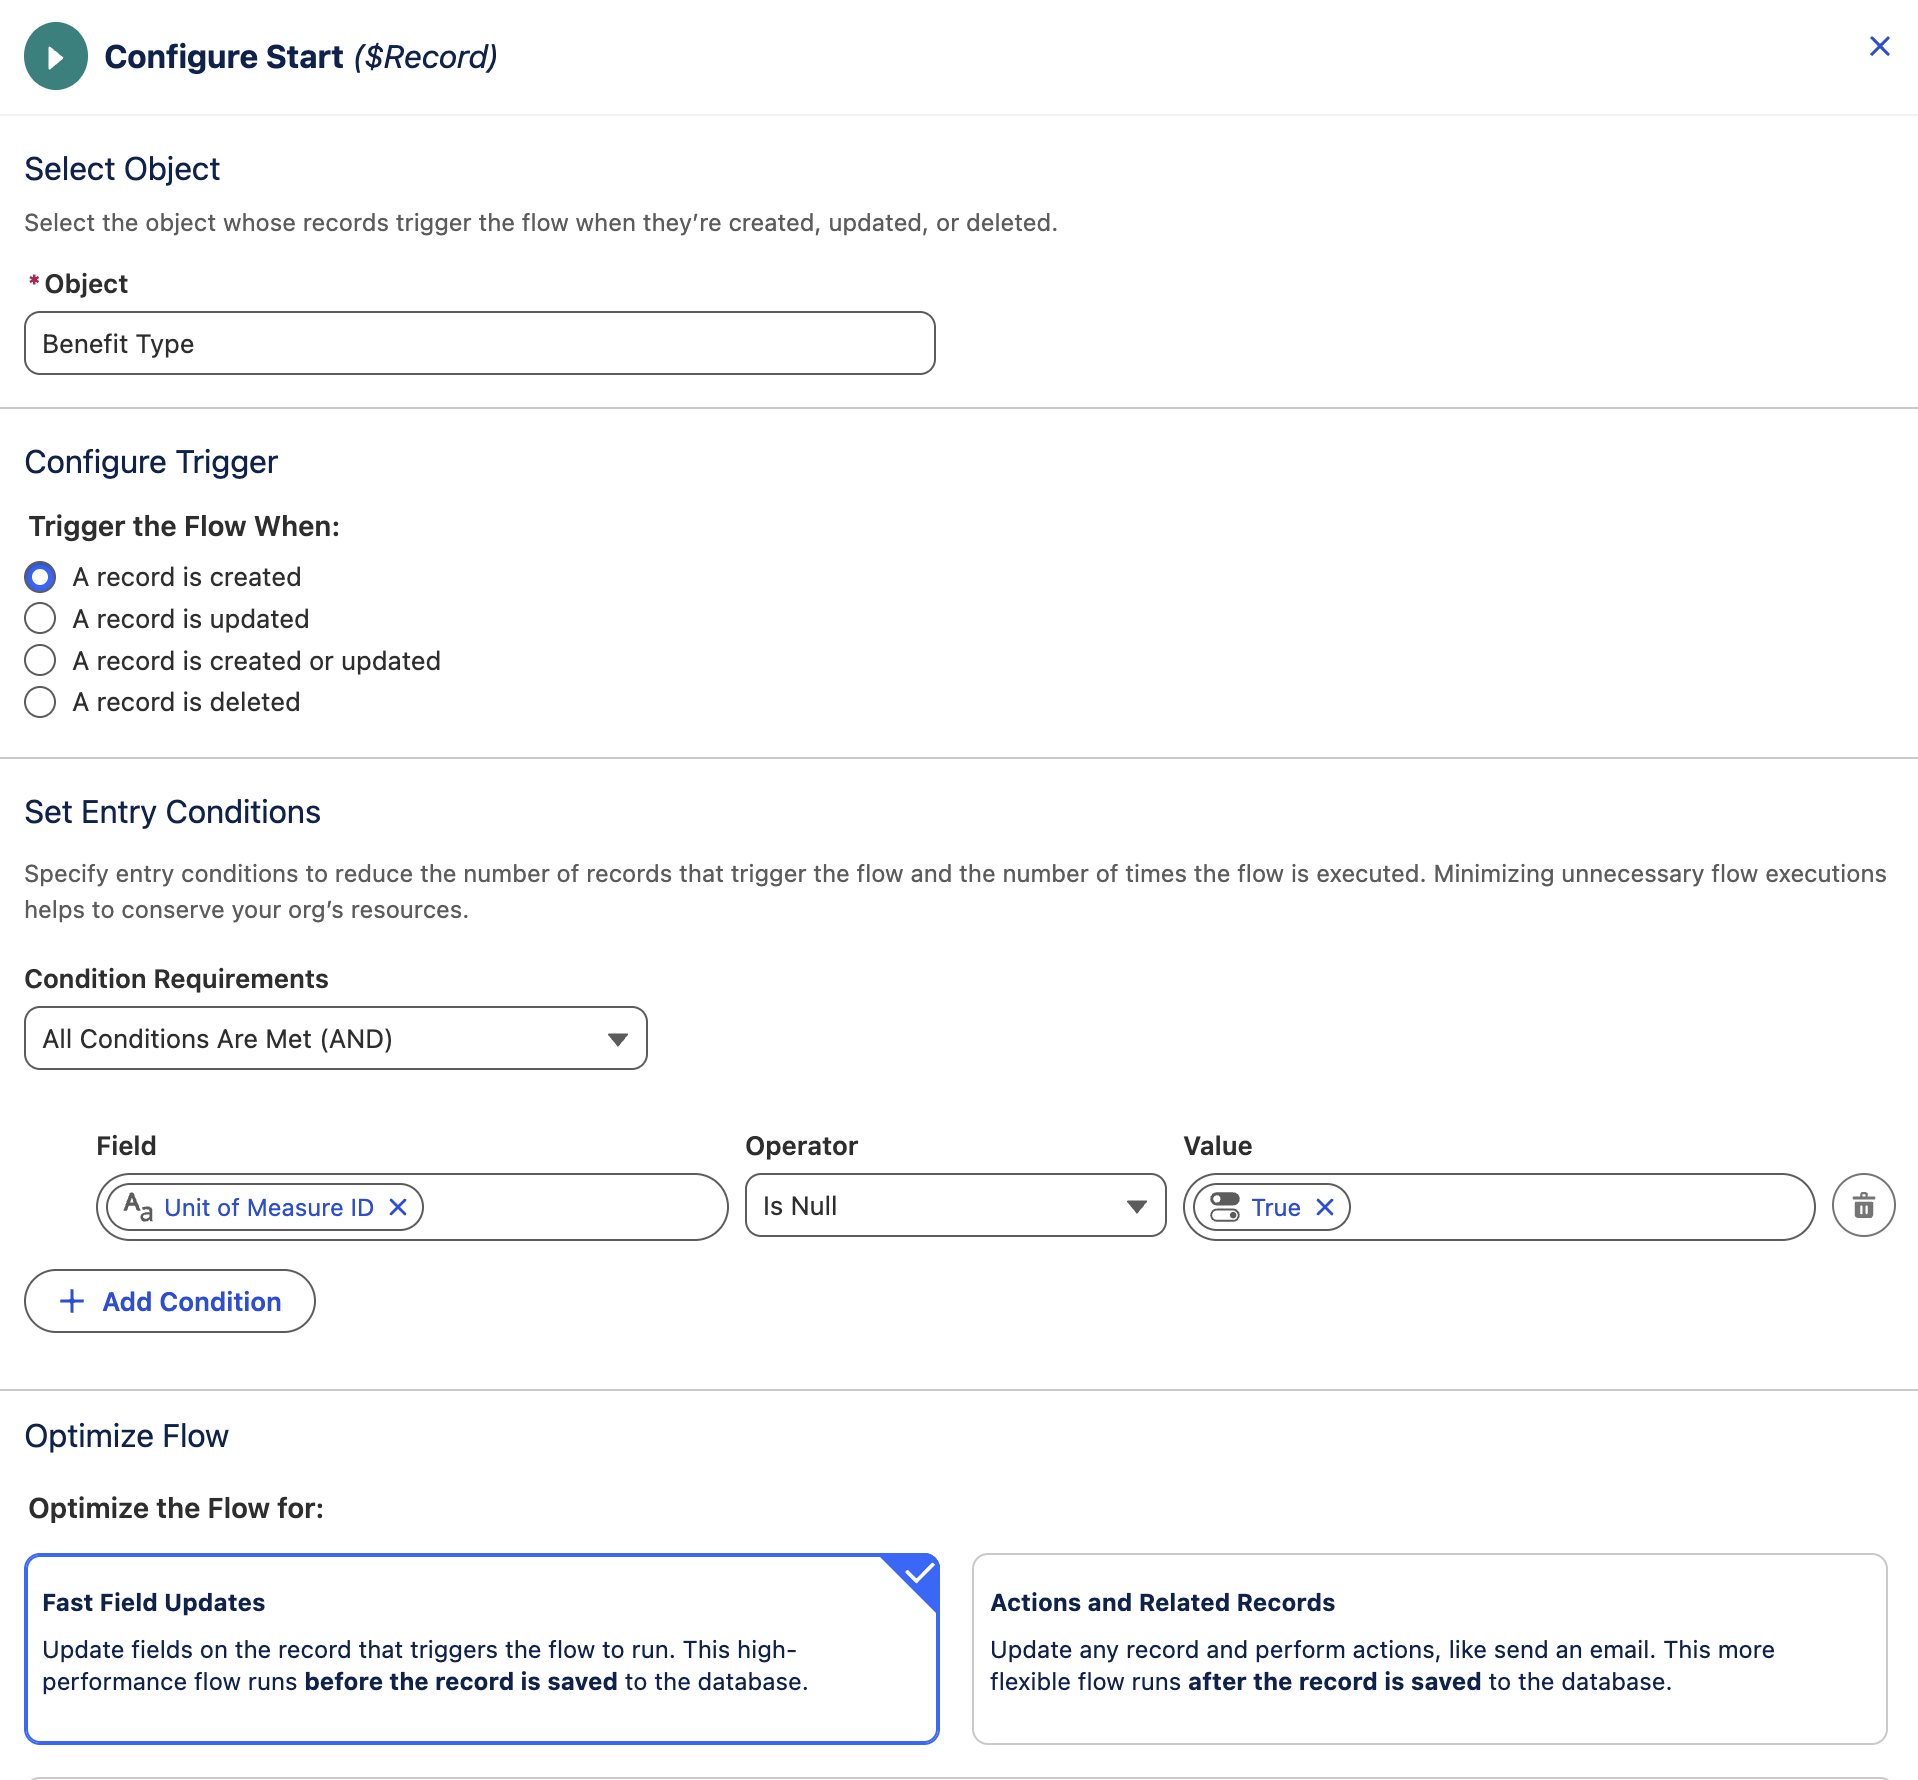
- Select the Record-Triggered Flow card.
- Enter and select
Benefit Typein the Object field. - Select All Conditions Are Met (AND) from the Condition Requirements menu.
- Select Unit of Measure ID from the Field menu.
- Select Is Null from the Operator menu.
- Select True from the Value menu.
- Select Fast Field Updates from the Optimize Flow section.
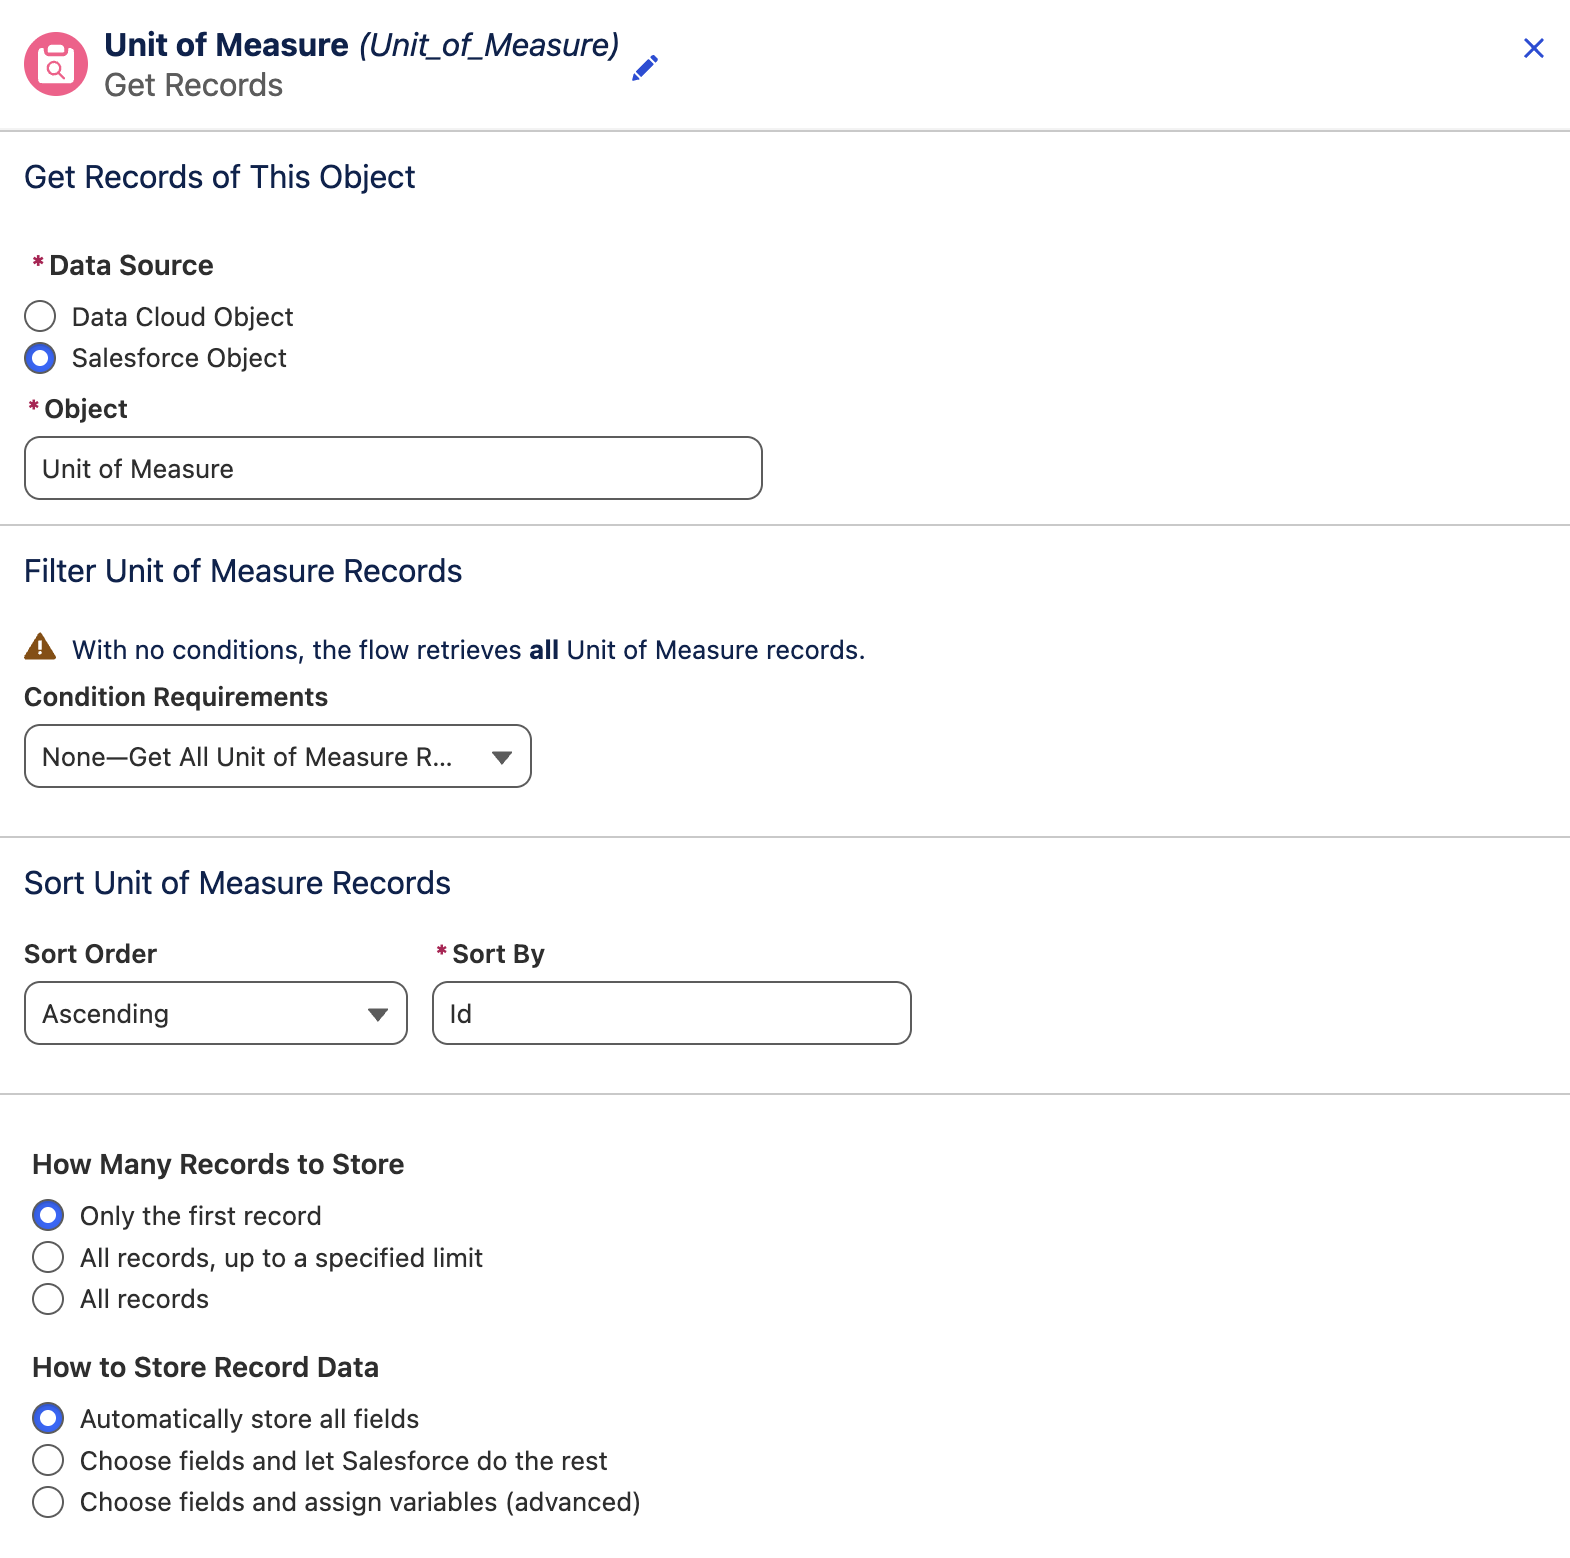
- Add a Get Records element to the Flow canvas.
- Enter and select
Unit of Measurein the Object field. - Select None—Get All Unit of Measure Records from the Condition Requirements field.
- Select Ascending from the Sort Order field
- Enter and select
Idfrom the Sort By field - Select Only the first record from the How Many Records to Store field
- Select Automatically store all fields from the How to Store Record Data field.
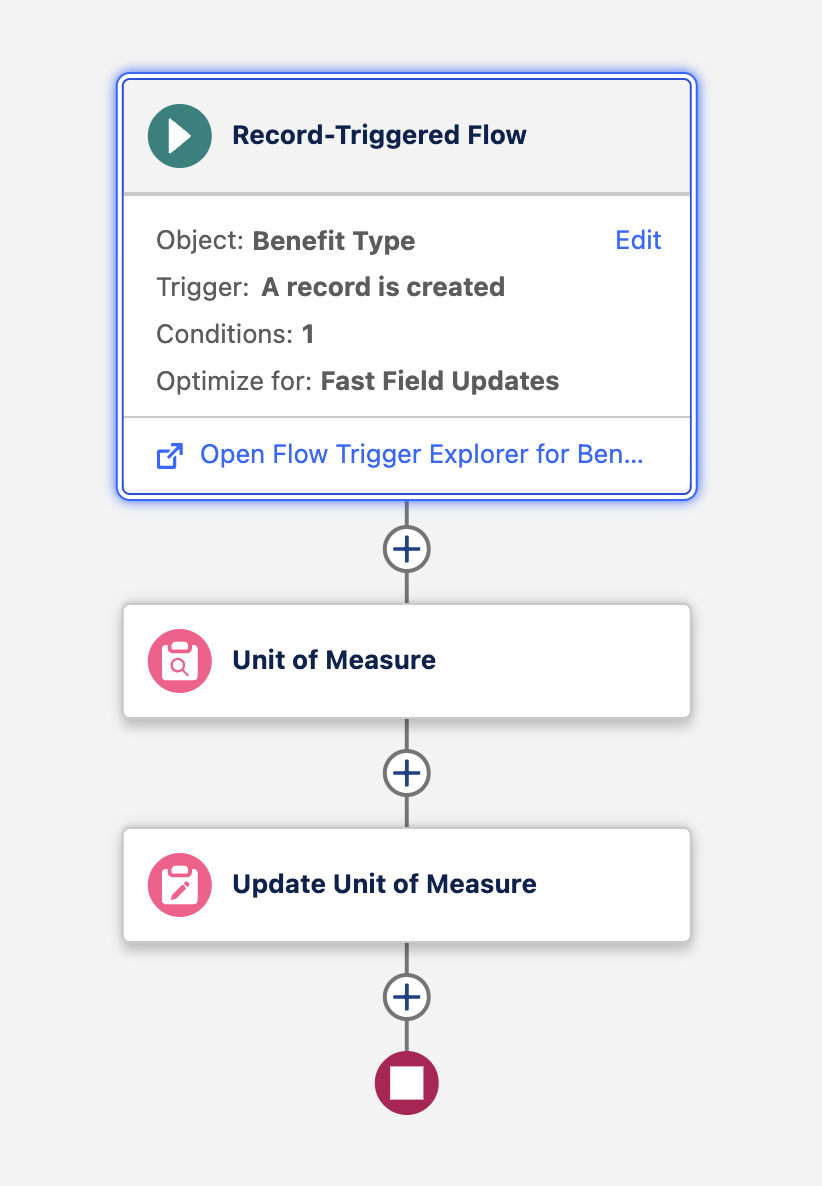
- Add an Update Records element to the Flow canvas.
- Select Use the benefit type record that triggered the flow option from the How to Find Records to Update and Set Their Values setting.
- Select All Conditions Are Met (AND) from the Condition Requirements menu.
- Select Unit of Measure ID from the Field menu.
- Select Is Null from the Operator menu.
- Select True from the Value menu.
- In the Set Field Values for the Benefit Type Record section, select Unit of Measure ID from the Field menu.
- Select Record Fields > Unit of Measure ID from the Value menu.
- Click Save.
- Click Activate.
Accrual and Redemption Activities
In this exercise you will configure accrual and redemption activities so that members can earn and spend points. You can view the activities that already exist in the program and accordingly add new activities.
Record Deletion
You can’t delete accrual and redemption activities.
- From the Loyalty Program page, Click
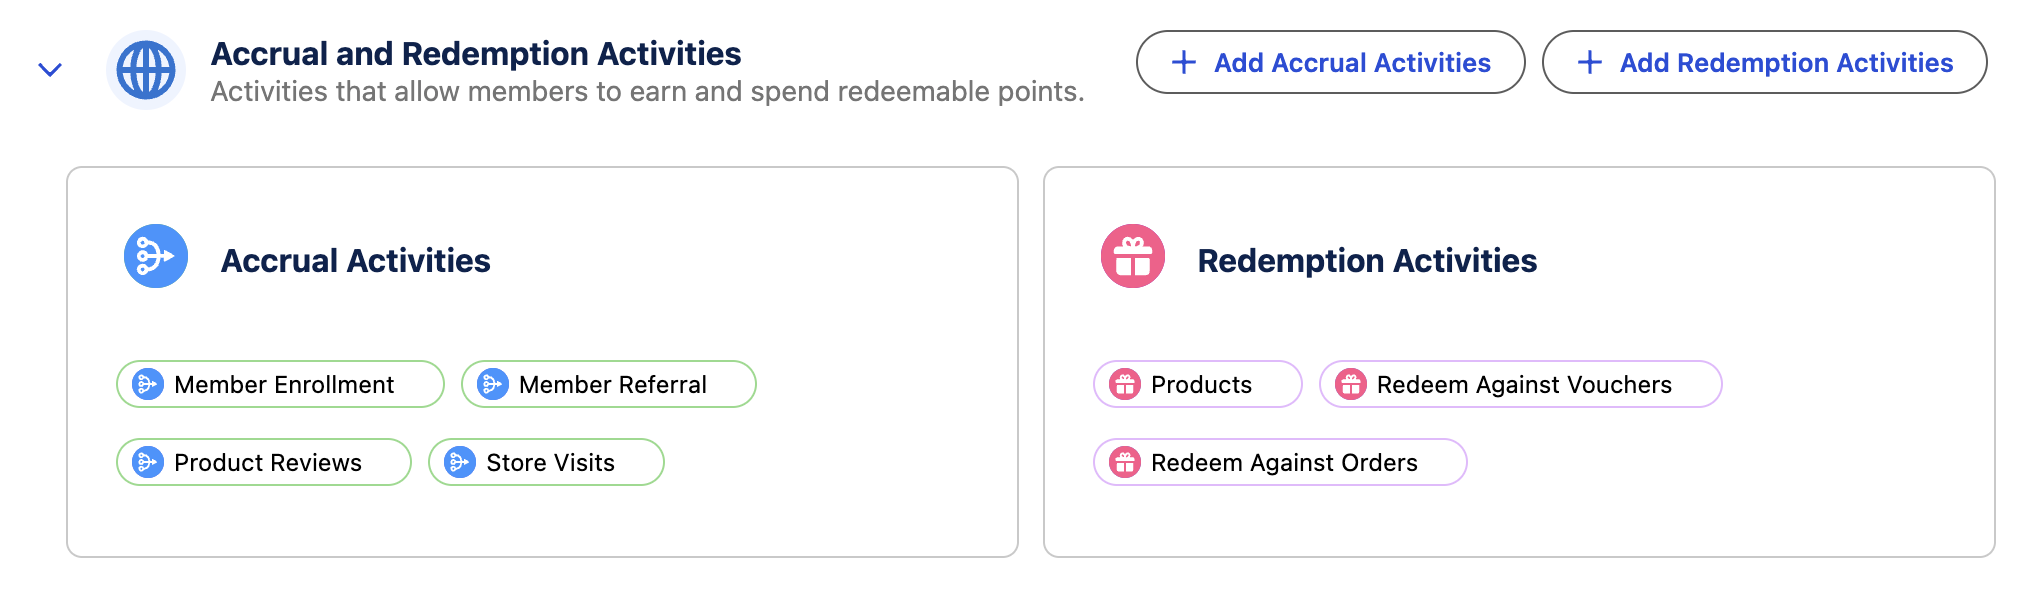
Add Accrual Activities in the Accrual and Redemption Activities section. - Enter
Product Reviewsin the Accural Activity Name field, then click Add. - Enter
Store Visitsin the Accural Activity Name field. - Click Add.
- Click Save.
- Click
Add Redemption Activities. - Enter
Productsin the Redemption Activity Name field. - Click Add.
- Enter
Redeem Against Vouchersin the Redemption Activity Name field. - Click Add.
- Enter
Redeem Against Ordersin the Redemption Activity Name field. - Click Add.
- Click Save.
- Expand the Accrual and Redemption Activities section to view the activities you created.
Activate Loyalty Program
Now your Loyalty Program is configured are ready to activate the program. Select Activate Program from the progam page banner.
